ECE 4110 Internetwork
Programming
Lab 3: UDP Traffic Generator
Group Number: ________
Member Names: _________________________ _________________________
_________________________
_________________________
Date Issued: Tuesday Jan.
31, 2006
Date Due: Tuesday Feb. 7, 2006
Last Edited: 1/26/06
Lab Goals
ÿ
Finish a UDP sockets
programs to transmit and receive UDP datagrams.
ÿ
Analyze UDPand TCP
network traffic using ethereal
Linux network utility.
ÿ
Filter out specific
information from ethereal using
custom filters.
Section I: Coding udp_gen & udp_sink
Before you start this lab, make sure that you can
access NAS (refer to ECE4110 Lab 1). After you are sure that NAS is mounted and
ready for access, perform the following steps to copy and extract the source
code that you will need to understand, comment, and modify:
$cd /mnt/nas/Lab3
<ENTER>
$cp lab3.tar ~/stevens_book/unpv12e/lab3.tar
<ENTER>
$cd ~/stevens_book/unpv12e
<ENTER>
$tar –xvf lab3.tar
<ENTER>
$cd lab3
<ENTER>
$ls <ENTER>
Now, you will see a
list of files. You will make modifications to a traffic generator program named
udp_gen.c and to a receiver program
named udp_sink.c. Then, your job
is to understand, comment, and complete these two pieces of software. To
compile and link them, you will use the command $make <ENTER>.
As
a starting point, look in the source code of the provided udp_gen.c and udp_sink.c for specifications of exactly how the programs should perform (on the
first lines of these files, there is a description on how to execute them from
the command line).
You
may find that some declared variables are not needed, so make sure that you
fully understand the data flow within the programs. Also add some code to print
out the number of MBITS PER SECOND that were sent as well as received. This
statistic should be written to the screen after the <CTRL+C> key sequence
is used to stop the program.
Note: When
writing your code for udp_sink.c, the fifth and sixth arguments of the Recvfrom
function call should be set to NULL:
Recvfrom(<something>,<something>,<something>,<something>,NULL,NULL);
Putting a pointer
to the client address there throws a weird error that we don’t know how to fix.
Section II: Getting data from udp_gen & udp_sink
At
this point your programs should finished and ready to perform data
transmission. The scenario to execute these programs is as follows:
To
run under X Windows:
1.
startx <ENTER> (If you have
already started X Windows, do not type startx)
2.
Open 2 terminals (by right click the mouse; choose the ‘New Terminal’ menu
option)
2.a)
in one terminal, type
$./udp_sink -D
- p 5000 <ENTER>
2.b)
in the other terminal after the first terminal is started, type
$./udp_gen
-D -P 5000 -a 57.35.6.(your_
own_IP_address_last_byte) <ENTER>
3.
To stop do type <CTRL+C> in the ./udp_gen terminal. You will see some
summary results in both
terminals.
4.
You will need to do a <CTRL+C> in the ./udp_sink terminal to stop that
process also.
Note
that you will need to do a ps and kill all of your traffic generator processes before you
can run this again (use man to
learn more about ps and kill Linux commands). Note that you may have to use ps
–ef to see your traffic gen/sink
processes.
Using
a packet size of 1,000 bytes per packet and a packet size variance of zero
bytes, determine what the inter-arrival time value you should use to
approximately generate 2, 4, and 6 Mbits/second of traffic. Also determine what
the maximum number of Mbits/sec you can receive with your traffic generator by
experimenting with the inter-arrival times. Fill in the following table and
turn it in with your printout:
|
Input Inter-arrival time in
seconds |
Mbits/sec received |
|
|
2 Mbits/sec (With Debug off) |
|
|
4 Mbits/sec (With Debug off) |
|
|
6 Mbits/sec (With Debug off) |
|
Put IA measured on sender in this box |
Debug ON only at the
sink. Enter the maximum Mbps for
the sink and gen. Sink _______ Gen ________ |
|
Put IA measured on sender in this box |
Debug OFF at both sink
and gen. Enter the maximum Mbps for
the sink and gen. Sink _______ Gen ________ |
|
Question: Show the math
equation and answer to how many Mbits/sec you expect if you were to input a
packet size of 500 bytes, zero variance and an inter-arrival time of 0.01
seconds |
|
Note: The debug mode for the udp programs
produces some weird behavior since we got the new machines. If you’ll notice, the packet count for
the sink and generator does not match if you let the simulation run long
enough. This is probably due to
the PC not being able to process incoming and outgoing packets and printing
data to the screen.
When
you have completed this Sections I and II, demonstrate to the TA the maximum
number of Mbits/sec you can generate with a packet size of 1,000 bytes, and a
packet size variance of zero. Make sure the TA records the maximum number of Mbits/sec
that you demonstrated. Look in the
Turn-in list for any deliverables at this point in the lab.
Check-off point: GTA Signature
________________________ Date
__________________
Section III:
Network Traffic Analysis using ethereal
For
this part of the lab, you will need to run udp_gen on ‘gatechftp,’ which is a machine that will be used
as the sender side. To make sure your results don’t get mixed up with those of
other students, you will need to use a unique port. Your port number should be
5000 + <your_group_number> (e.g. for group 1, that’s port 5001).
On
your machine, open a terminal and type $telnet 57.35.6.245 <ENTER> (this will establish a telnet session between your
machine and gatechftp). Use linux_class as the user and linux_class
as the password. Once the telnet session is opened, type the following
commands.
$cd lab3 <ENTER>
$./udp_gen –i 0 -P <your_port_number> -a
<your_ip_address> <ENTER>
(this executable is already there for you. DO NOT PUT
YOUR OWN UDP_SINK CODE ONTO GATECHFTP, USE ONLY THE PROGRAM ALREADY THERE. IF
YOU GET A CORE DUMP MAKE SURE NO OLD UDP_SINK PROCESSES ARE RUNNING, IF SO KILL
THEM. Use $ps -ef | egrep “udp_gen”<ENTER> (udp_gen
between quotes) to check for running processes. (Do not run the generator in
debug mode, -D argument)
On
your machine, you will have to run ethereal, and your udp_sink program to receive and capture UDP traffic, so just
follow the instructions below.
In one terminal, start network analyzer (ethereal) by typing $ethereal & <ENTER> or clicking the Redhat icon in the lower left corner
of your screen and selecting
System Tools => Network Analyzer.
View=>Time Display Format=>Seconds since previous packet
Under capture => Options
Turn on ‘capture packets in
promiscuous mode’
Turn on ‘update list of packets in
real time’
Turn on ‘automatic scrolling in live
capture’
Turn off ‘Enable MAC Name
resolution’
Turn off ‘Enable network name
resolution’
Turn off ‘Enable transport name
resolution’
click [OK] button
In
a second terminal, type $./udp_sink –p <your_port_number><ENTER>
to start your udp traffic receiver.
On
gatechftp, type <CTRL+C> in
traffic generator window after 10 to 20 packets have been transmitted. Stop ethereal from collecting any more data by clicking the [Stop]
button. Also, stop your sink from running by pressing <CTRL+C>. Then, at gatechftp, type $ps -ef | egrep “udp_gen”<ENTER> and find the process corresponding to the udp_gen you were running by looking at the port numbers. Once
you find that process, the process ID number for that process is located in the
second column from the left. Kill
the process using that number. Make sure you don’t kill some other student’s
udp_gen.
Q1. Looking at either tcpdump or ethereal, what differences do
you see between a UDP data transfer and a TCP data transfer? (You can support
your reasoning with results from Lab2, and the TCP state diagram).
Look
at the protocol detail available in ethereal. With the mouse, select one of your UDP datagrams. In
the lower window, you can expand the various frame components by clicking on
the plus sign. Answer the following questions:
Q2. Draw IP and UDP
headers and label their field. Then, looking at the details of a packet
captured by ethereal, fill in the corresponding values in hexadecimal. Make
sure that you specify how many bits are used per field.
Q3. Only for the IP
header, double check by hand the checksum field (in binary).
For the rest of this section
you will need to run your tcp_gen
and tcp_sink programs from lab2 in
addition to your udp_gen and udp_sink programs. To do this, you will need to open two more
terminals. Then, use one of those terminals to telnet to gatechftp using the
same username and password.
The scenario will look like
the one below.
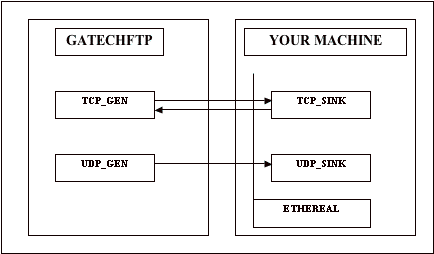

Your commands will look like
this:
$./udp_sink –p
<your_port_number><ENTER>
$./udp_gen –i 0 -P <your_port_number> -a
<your_ip_address> <ENTER>
$./tcp_sink –p
<your_port_number+ 1000><ENTER>
$./tcp_gen –i 0 -P <your_port_number + 1000>
-a <your_ip_address> <ENTER>
The tcp_gen file is located in /home/linux_class/lab2 directory
in gatechftp. Once everything is set, do the following.
1.
Start Ethereal the same
way you did before
2.
Start your udp_sink and tcp_sink
programs on your machine
3.
On gatechftp, start your
tcp_gen first, and your udp_gen second
4.
Let ethereal capture
packets for 3 to 5 seconds.
5.
Stop your generators,
and your sinks. followed by stopping Ethereal.
In Ethereal, you will see a
textbox on near the top named ‘Filter.’ You will be working with filters. To
answer the following questions you can use the internet, or man. Your task is
to write and test filters that will function as described bellow.
Filter 1: Frames that
carry TCP datagrams that are sent from your machine to gatechftp.
Filter 2: Frames that
carry UDP datagrams and are directed to port <your_port_number> ‘on your’
machine ‘from’ gatechftp.
Filter 3: Any frame that carry
UDP datagrams which have a frame size between 650 and 999 bytes in length.
Turn-in List
1. Turn in to the TA (at the
end of Section II) a hardcopy printout of your code. Make sure that you highlight
the changes that you made. (note:
highlight is different than underline, enclose in a box, etc)
We now have a printer in the
lab, in the right corner as you enter the lab. Directions for setting up the printer and printing are given
in the appendix to Lab 2. Please
try not to waste paper, i.e., do not print another whole copy of a file for a
few small changes, just mark them in pen.
2. A completed table like the
one in Section II. You may hand
draw a table on your code printout.
3. Questions and Answers in
Section III.
Grading Notes
1. How well documented and
well commented your programs are. Neatness and style does count. You should
improve on this even in the parts that we provided to you.
2. Group number and group
member names in the very first comments of both of your programs as well as the
date when the file was modified should be included.
3. You will want to put your
programs on a floppy occasionally, so if you loose data on your Hard Drive in a
crash, you will not loose your programs. The appendix from previous lab contains
guidelines on how to do that.
3. Correctness of your
answers and discussions.